Architecture

Prerequisites
- Have a AWS CLI configured with admin permission to create resources and launch the CDK stack
- Have AWS git-remote-codecommit setup with your account to be able to interact with the CodeCommit repository in your account
- Have Snyk token and Snyk Org ID available to you on AWS SSM Parameter store in your AWS account
Setting up the environment
1. Creating AWS CodeCommit repository
Before starting this section, make sure you have a CodeCommit repository created in your AWS account. Once the CodeCommit repository is created, we will try to emulate a requirements.txt in that repository.
To create a new CodeCommit repository using AWS CLI , run the following command.
> Ensure you have codecommit:CreateRepository permission for your user profile
aws codecommit create-repository --repository-name MyDemoRepo --repository-description "Snyk test repo"Once the repository is successfully created you will see a message like the one below
{
    "repositoryMetadata": {
        "repositoryName": "MyDemoRepo",
        "cloneUrlSsh": "ssh://ssh://git-codecommit.us-east-2.amazonaws.com/v1/repos/MyDemoRepo",
        "lastModifiedDate": 1446071622.494,
        "repositoryDescription": "Snyk test repo",
        "cloneUrlHttp": "https://git-codecommit.us-east-2.amazonaws.com/v1/repos/MyDemoRepo",
        "creationDate": 1446071622.494,
        "repositoryId": "f7579e13-b83e-4027-aaef-650c0EXAMPLE",
        "Arn": "arn:aws:codecommit:us-east-2:112233445566:MyDemoRepo",
        "accountId": "112233445566"
    }
}
Copy the Arn, and cloneUrlHttp fields in a separate place for usage later in the deployment stage
This repository will be the source for the CodePipeline we’ll deploy next. Every time a developer commits his/her code to this repository, the Snyk pipeline will trigger the scans and provide information on the vulnerabilities found in the Python package dependencies.
2. Setting up CDK
To Deploy the cdk resources, clone down the workshop base. Navigate to workshop-resources/cdk/snyk-codesuite-cdk. Once in the repo initialize the virtual env and run
pip install -r requirements.txtSet your AWS Credentials in the CLI then navigate to the file located at workshop-resources/cdk/snyk-codesuite-cdk/cdk_snyk_construct/cdk_snyk_construct_stack.pyand fill in the required parameters saved from previous steps.
Once the parameters are filed out run the command
cdk deploy cdk-snyk-stackDeployment
Once you have the CodeCommit repository ready, and CDK setup, we will now move into the deployment stage. In this stage we will first setup the scanning pipeline , and then commit our code to the CodeCommit repository which will trigger the pipeline and perform the Snyk scan.
1. Deploying the CDK stack
TODO: Put a link to the code for this lab here
- Go into
cdk_stack_deploy/cdk_snyk_stack.pyand fill in the following values:repo_name: ARN of the CodeCommit repository which you created earlier in the setup section of this guiderepo_branch: Branch name in the CodeCommit repository which you want to be monitored by Snyksnyk_org: Name of the AWS SSM Parameter Store parameter which holds the Snyk Org IDsnyk_token: Name of the AWS SSM Parameter Store parameter which holds the Snyk token
Once the values have been updated, return to the
snyk_codecommitfolder and enter the following command:cdk lsIf everything has been setup correctly you will see one stack displayed without any errors.
Now to deploy the stack, run the following command
cdk deployThis command will trigger the stack to be deployed and you will see the progress of deployment in your CLI.
Once the stack has been successfully deployed, you can go into your AWS console, and verify that a CodePipeline has been created, which looks something like this

2. Setting up the CodeCommit repository with appropriate files
Now that you have the CodePipeline ready to be scanning the CodeCommit repository. We have to commit some Python code into the repository to be scanned. In the spirit of experimentation, you can upload any requirements.txt you have or create a new requirements.txt with the following content:
PyYAML==5.3.1
Pillow==7.1.2
pylint==2.5.3
Jinja2==2.11.1
Note: These packages and the respective versions are deliberately not the latest to help you see vulnerabilities in Snyk.
Once you have selected/created your requirements.txt file of choice, commit this file to the branch you selected earlier to be monitored by Snyk.
If everything has been configured correctly, you can go into your AWS CodePipeline console and see that the pipeline has started executing itself. Wait for the pipeline to complete successfully before moving onto the next section.
Checking results and remediating findings in Snyk
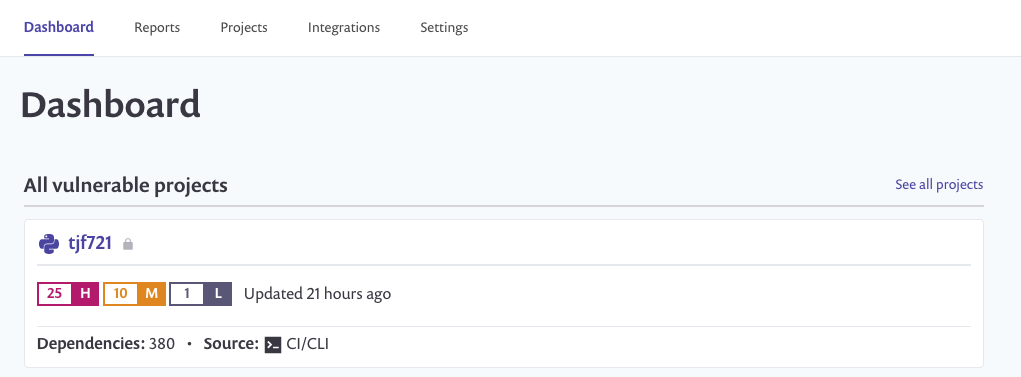
Now that your CodePipeline has successfully completed, login to the Snyk console You will enter into your Dashboard view of Snyk which should show a project with same name as your repository you just scanned.

Just underneath this you will see the number of High, Medium, and Low vulnerabilities found in this scan. Click on the project name, this will take you to the detailed view of which package dependencies have been marked by Snyk as vulnerable.

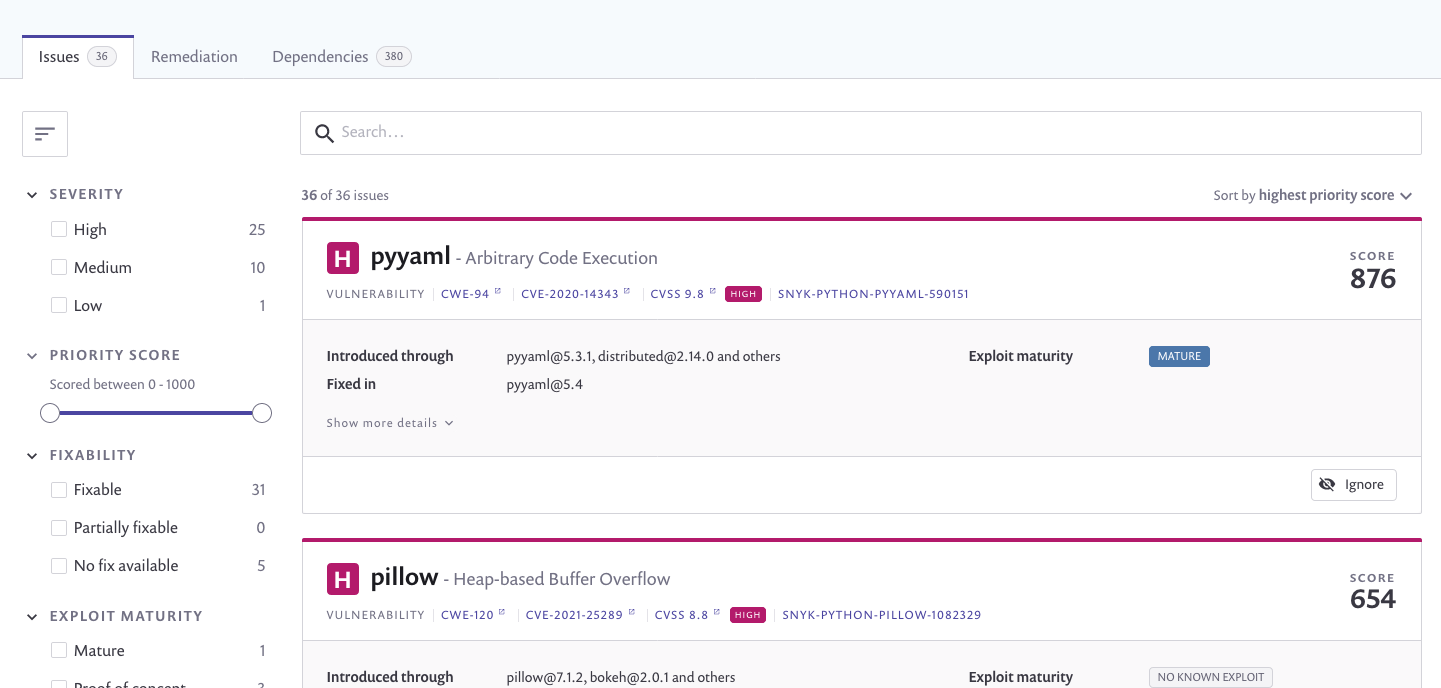
In this view you get the details of the vulnerability found by Snyk, you also get recommendations on how these vulnerability can be remediated.
If you have used the sample requirements.txt mentioned above, you will see the py yaml package vulnerability can be remediated by upgrading the version to PyYAML==5.4.
Go back to your CodeCommit repo and commit the change to the version as recommended by Snyk. This new commit triggers the CodePipeline again.
Once the pipeline has successfully finished execution, come back to the Snyk dashboard and you should see the vulnerability not being reported anymore.
Depending on how your vulnerability scanning and resolution operations are setup, you can also choose to fail the pipeline upon getting vulnerabilities of a certain severity. Snyk provides more guidance in their documentation on how to customize Snyk CLI to cater to specific scan configurations.
Cleanup
As this lab creates resources which will accrue cost if not delete, please run the following commands to cleanup the resources in this lab.
cdk destroyAfter the CDK stack has been destroyed, move onto deleting the CodeCommit repository using AWS CLI command
aws codecommit delete-repository --repository-name MyDemoRepo